

Since I use garlic in virtually everything I cook, I thought I would take to my garden and give harvesting my own garlic a whirl. To my surprise, it was quite simple and the results were delicious! You might consider this type of garlic, green garlic, but nonetheless it’s the real deal.
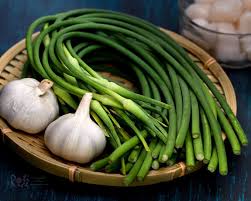
While the green garlic, looks more like a large scallion with a purple tip, the taste masques a cross between a garlic clove and a green onion. I loved this! And of course, the options for cooking with this lovely hybrid was ubiquitous. Think stir fry, pasta, salad dressing, roasted vegetables… The list goes on.
Initially, after I planted the cloves and waited the 16-24 weeks for them to harvest, I never pulled an actual garlic head. That’s why my first instinct when I pulled my first stem, was failure. That all changed when I was strolling through the farmers market and saw a ‘bunch’ of these stems for sale. Guess what they were called? Garlic. I was pumped! Naturally, I ran home, pulled a few more stems, and took them straight to the kitchen. The result = sweet success!
Step 1: Prepare some good organic soil in a gardening bed that is exposed mostly to sun. Raised beds work well because they allow for good drainage.
Step 2: Find yourself a good organic head of garlic. Since garlic seeds are sourced from the actual cloves, you can just break up a good head of garlic to start the process. Make sure you get organic garlic heads, or an even better choice would be to grab a head at your local farmers market. That would help ensure that your garlic hasn’t been sprayed. You want to choose the largest garlic cloves you can find so the result is the same.
Step 3: Break the head of garlic up into cloves, trying not to damage any of them. You are now going to take each clove and plant them flat side down, pointed side up. The clove should go approximately 2 inches into the soil. Continue planting each garlic clove, spacing them 6 to 8 inches apart. Cover with mulch and fertilize with an organic fertilizer, and you are on your way!
Step 4: Garlic only needs to be watered once a week. In about 4-6 weeks you’ll start to see green scapes start to pop up.
This typically means you’re growing hardneck garlic. Harvesting depends on climate and temperature. Typically, when the lower leaves turn brown and there is still green at the top of the stalks, it’s a good time to test one out. This could take up to 4-6 months. However, if you pull the garlic stems earlier, like I did, you can use the scapes and the ‘onion’ part of the bulb before they harvest a full bulb of garlic.
Grow your own garlic
 (No Ratings Yet)
![]() Loading...
Loading...
Through research, I discovered that the ideal time to plant garlic is in mid fall or early spring. I pulled out my first scape around 12 weeks and got what some call ‘green garlic’.
It looked like a small green onion so I waited another 4 weeks until I saw a purplish hue at the end of the stalk. That’s when I decided to pull mine, after I saw it perfectly bunched up for sale at the farmers market. You can smell the garlic when it’s done! Since this was my first go at it, I started in the fall.
I’ll give a new technique a try this spring and let you know how that turns out. Here are pictures from my test garden, and photos of the scapes pulled before full harvest. I used these sliced up just like garlic, and they were tasty!

No Comments